How to Make an Envelope Gift: Creative and Personal
Making your own envelope gift may sound like a simple craft project, but it turns out to be surprisingly creative. Did you know that the right paper or cardstock makes the difference between flimsy packaging and a sturdy, eye-catching piece? It's not just about wrapping. With clever choices and a few simple tricks, you can bring a smile to the recipient's face before the gift is even opened, and it all starts with quality materials .
Table of contents
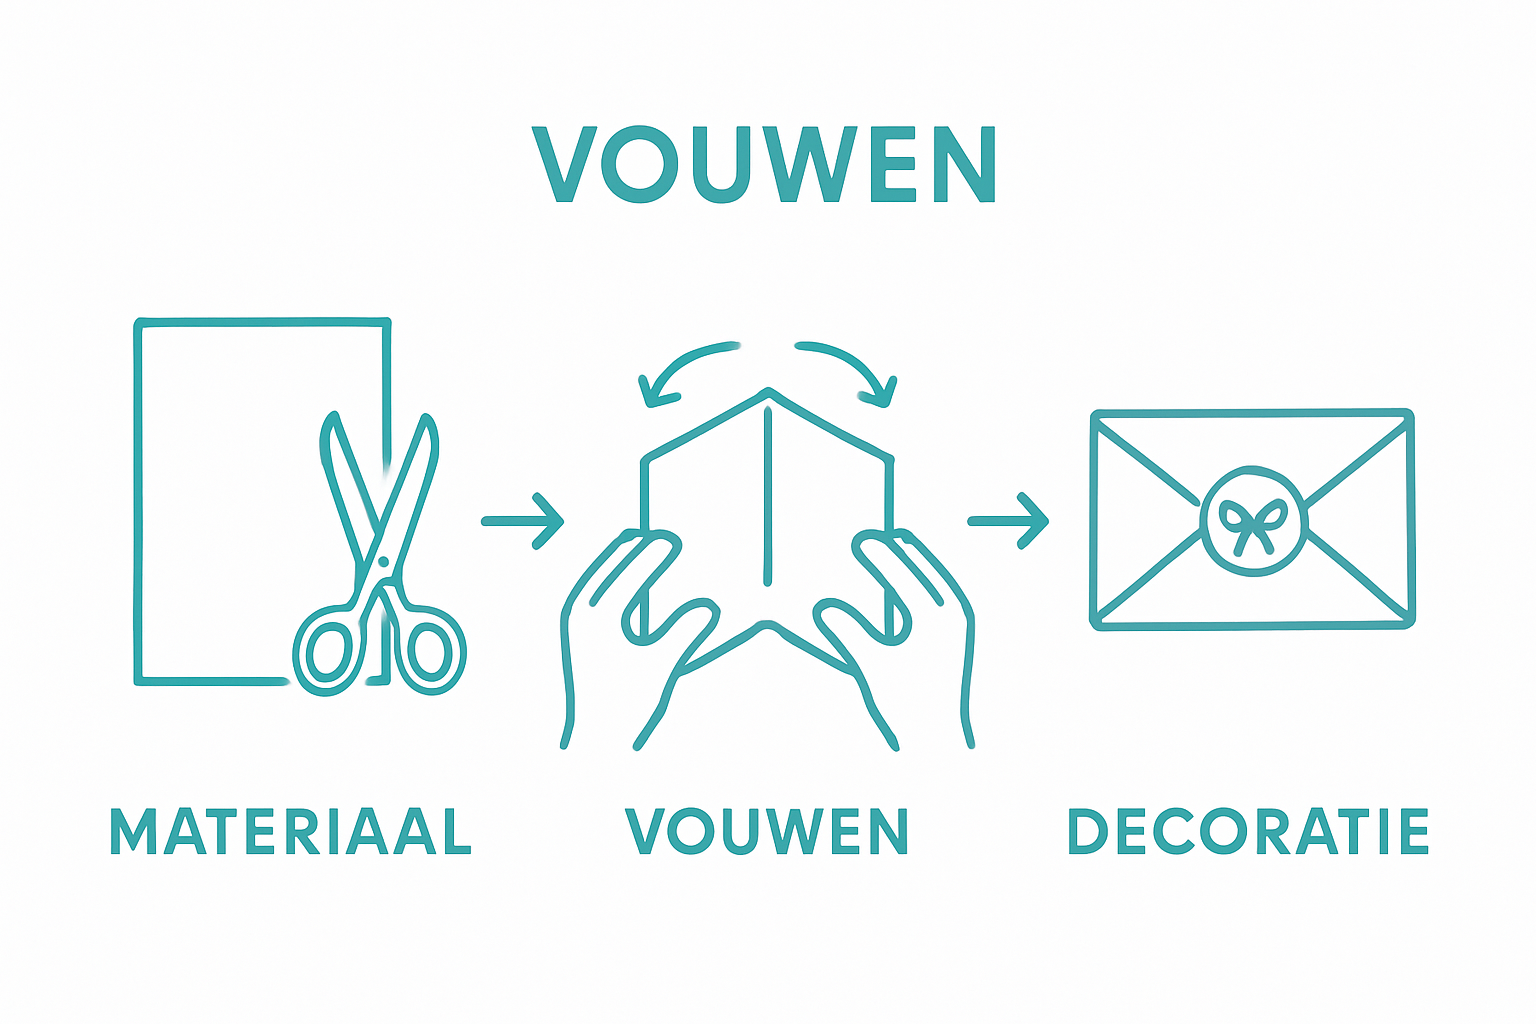
- Step 1: Gather the materials you need for your envelope
- Step 2: Choose a design and cut the paper to size
- Step 3: Fold the paper into an envelope shape
- Step 4: Secure the edges with glue or tape
- Step 5: Personalize your envelope with decorations
- Step 6: Check if the envelope is ready for use
Short Summary
| Important Point | Explanation |
|---|---|
| 1. Collecting materials | Make sure you have sturdy paper and tools to create a unique envelope. |
| 2. Precise cutting of paper | Cut paper 2cm larger than the gift for a perfect fit. |
| 3. Make tight folds | Use a bone folder to get sharp, neat folds. |
| 4. Attach the edges with glue or tape | Use double-sided tape for a neat finish without visible glue. |
| 5. Add personal decorations | Choose decorations tailored to the recipient for a unique look. |
Step 1: Gather the materials you need for your envelope
Creating a great envelope gift starts with gathering the right materials. The process can be as personal and creative as the gift itself. You'll need a selection of tools and materials that will allow you to create unique and attractive packaging.
First, create a sturdy base with high-quality paper or cardstock as your envelope material. Ideally, choose paper that's sturdy enough to hold its shape but flexible enough to fold beautifully. Tissue paper, decorative wrapping paper, or sturdy colored cardstock are excellent options. See our guide on basic gift wrapping materials for more detailed inspiration.
Besides paper, gather some essential tools. You'll need:
- Sharp scissors for precise cutting
- A folding bone or ruler for neat folds
- Tape or a handy glue stick
- Decorative elements such as ribbon, stickers or small decorations
Consider the atmosphere you want to convey. Do you want a sleek, modern design or a playful, romantic look? Your choice of material will determine the final look of your personalized envelope. Experiment with different textures and colors to achieve a unique result.
Keep in mind that the materials shouldn't just be functional but also appropriate for the person you're giving it to. An envelope is more than just packaging; it's a first impression of your gift and the thought behind it. Choose materials that will surprise the recipient and bring a smile to their face.
Before you begin, make sure you have all the materials at hand. Nothing is more frustrating than realizing you're missing something halfway through the process.
Below you'll find a handy overview table of all the materials and tools needed to make a gift envelope, including their uses and recommended tips.
| Materials/Tools | Function | Recommended Tip |
|---|---|---|
| Sturdy paper/cardboard | Base for the envelope | Choose a thickness that suits the gift |
| Sharp scissors | Precise cutting | Use on a hard surface |
| Folding bone/ruler | Creating sharp, neat folds | Fold carefully, avoid cracks |
| Tape/glue stick | Fixing edges | Double-sided tape for invisible finishing |
| Ribbon/stickers/decorations | Personalizing the envelope | Match decorations to recipient |
| Lay everything out neatly on a spacious work table with plenty of light, so you can focus and be inspired to create your personalized envelope gift. |
Step 2: Choose a design and cut the paper to size
After gathering your materials, the exciting phase of designing and preparing your envelope begins. Choosing the right design and accurately cutting your paper is crucial for a professional and personalized result. Discover more creative wrapping tips to take your project to the next level.
Start by determining the size of your envelope. Measure the gift you want to wrap and allow about 2 centimeters of extra space on all sides. This will give you enough room to fold and seal neatly. Keep in mind the thickness of your gift; some gifts require more space than you might initially think.
You have several design options. You can choose a classic rectangular shape or experiment with more creative shapes like a heart or a star. Use a sharp pencil to lightly sketch out your design first. This will help you avoid mistakes before you make the final cuts. Use sharp scissors or a precision knife for the best results.
Here are some tips for precise cutting:
- Work on a smooth, hard surface such as a cutting mat
- Hold your scissors or knife tight against a metal ruler for straight lines
- Always cut slightly wider than your final size for extra room to play with.
Pay extra attention to patterns or printed paper. Make sure you cut the design symmetrically and that important details or motifs are centered. A small difference can affect the entire final result. Take your time to work precisely.
Once you've finished cutting, carefully fold the edges to check for a perfect fit. Small corrections are still easy to make at this point. A well-cut sheet of paper is the foundation for a great envelope that not only looks beautiful but also feels sturdy and professional.
Finally, make sure your design reflects the recipient's personality. A personal touch makes your gift extra special and shows how much effort you've put into it.
Step 3: Fold the paper into an envelope shape
After carefully selecting and cutting your paper, the art of folding begins. Transforming a flat sheet of paper into an elegant envelope requires precision, patience, and a steady hand. Discover our guide to neat wrapping for additional inspiration and technical tips.
Start with the paper lying on a smooth surface, decorative side down. Use a bone folder or the edge of a ruler to create sharp, clean folds. This prevents unsightly dog-ears and gives your envelope a professional look. If your folds aren't neat, the final result will look messy.
Folding an envelope requires a systematic approach. First, determine the correct fold direction by dividing your paper into equal segments. Fold the bottom point up about one-third, so that it ends exactly in the middle. Then fold the sides inward, slightly overlapping. This creates the characteristic envelope shape with sharp corners and a sleek profile.
Here are some crucial points to keep in mind while folding:
- Ensure clean, straight folds without wrinkles
- Check that the corners meet exactly
- Use light pressure to sharpen the folds
A common mistake is applying too much pressure, which tears the paper. Be gentle but decisive. If you notice your paper starting to tear, use a fresh sheet and start over. Perfection takes patience and practice.
Once you've folded the base of your envelope, it's time for the finishing touches. Use a small amount of double-sided tape or a glue stick to secure the sides. Make sure the glue is only applied to the ends to prevent your gift from sticking together.
The result should be a tight, sturdy envelope with sharp folds and a neat finish. Check that the envelope is large enough for your gift and that the edges are even. A well-folded envelope is not only functional but also creates a surprise in itself before the gift is even opened.
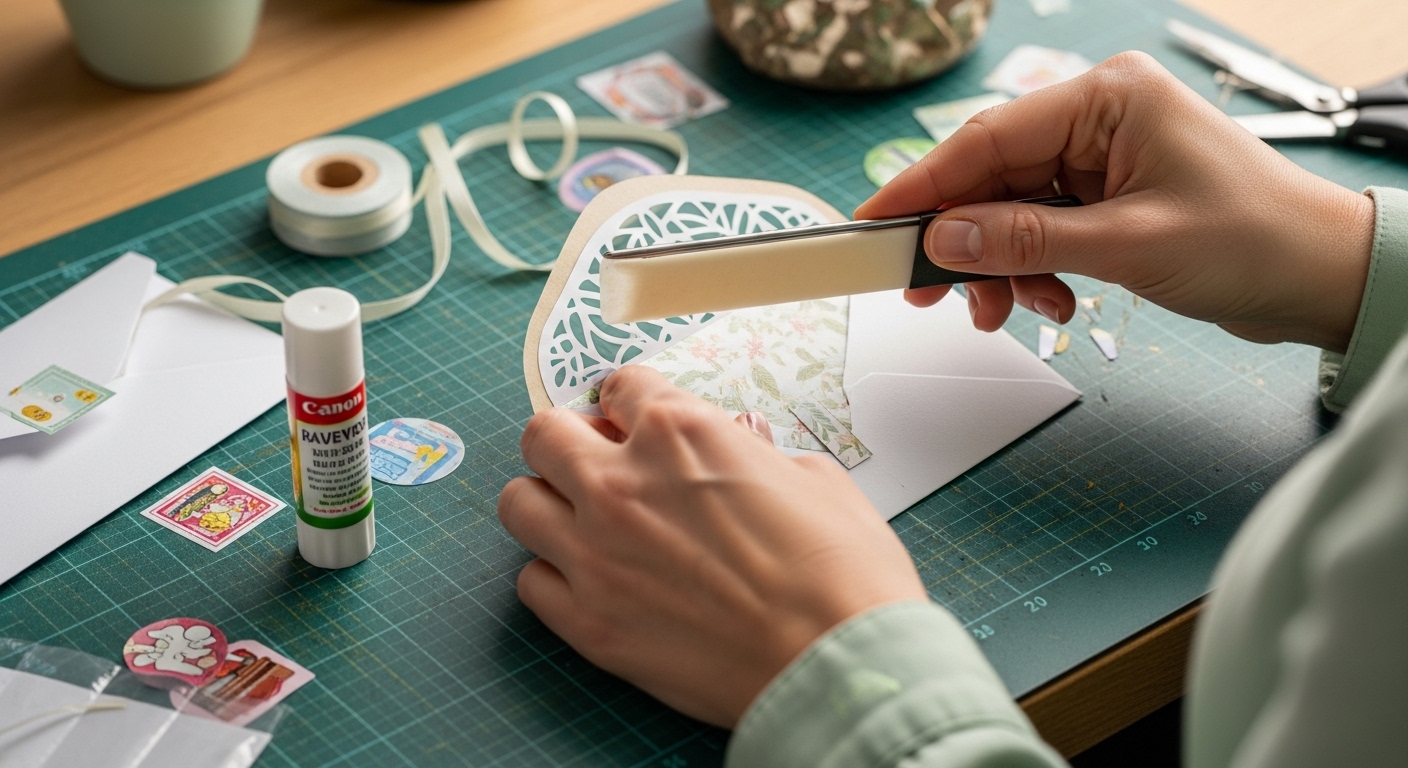
Step 4: Secure the edges with glue or tape
After carefully folding your envelope, it's time to firmly seal the edges. Check out our creative wrapping tips for additional inspiration on finishing your envelope.
Choosing the right adhesive or tape is crucial for a professional finish. Double-sided tape is an excellent choice for clean and invisible attachment. Use it sparingly and ensure you apply the tape precisely to the folds. Too much adhesive can make your envelope look messy and may even show through.
An alternative is a glue stick, which is ideal for lighter materials like tissue paper or thin wrapping paper. Apply the glue in a thin, even layer along the edges. Be careful not to apply the glue too close to the edge to prevent it from peeking out or causing smudges.
Here are some important points to consider when attaching the edges:
- Ensure a clean, dry work surface
- Use a sharp edge or bone folder to smooth the glued edges
- Check that the edges fit together exactly
When working with decorative paper or specialty materials like washi tape, you can add a special touch to the edges. Use a narrow piece of colored or printed tape along the seams to add a personal touch. This is a great way to make your envelope even more special.
Be careful to only apply the glue or tape where needed. The top of the envelope should remain open so you can easily insert the gift. Avoid using too much glue at the top, as this can make opening the envelope more difficult.
After securing the edges, it's important to sit down and check the envelope. Gently press the edges to ensure everything is secure. The envelope should feel firm without wrinkles or loose edges. A well-secured envelope is not only stronger but also looks much neater.
If you're unhappy with the result, don't hesitate to start over. Creating the perfect envelope takes patience and practice. Each one you make will be better than the last.
Step 5: Personalize your envelope with decorations
Now that you've created the base of your envelope, it's time to make it truly unique. Personalization is the key to an unforgettable gift that will instantly touch the recipient. Discover our tips for luxury gift wrapping for additional inspiration when decorating your envelope.
Choose decorations that reflect the recipient's personality . If you're making an envelope for an art lover, consider decorative elements like small sketches, watercolor spots, or colorful ribbon. For a more professional recipient, opt for sleek, minimalist decorations with metallic accents or subtle stamps.
Ribbon is a classic and versatile decoration. Choose ribbons in different widths and textures. A narrow silk ribbon can add elegance, while a wide striped ribbon creates a more playful effect. Tie the ribbon into a bow or wrap it elegantly around the envelope. Be careful not to overdo it; it should retain a delicate touch.
Here are some creative decorating ideas:
- Use vintage stamps as a decorative element
- Make small paper flowers or origami shapes
- Stick colored washi tape along the edges
- Use special stamps or handwritten calligraphy
Also consider three-dimensional decorations. Small wooden buttons, dried flowers, or mini clothespins can create a surprising effect. However, be careful with the thickness, as some decorations can make the envelope too bulky and prevent it from fitting through the mailbox.
For a truly personal touch, you can hand-calligraph the recipient's name or add a small drawing. A handwritten message or subtle illustration makes the envelope much more than just packaging; it becomes a work of art in itself.
Pay attention to the balance between decoration and readability. Too much embellishment can distract from the essence. The goal is to create an embellished envelope that surprises and touches the recipient without being overwhelming.
Ultimately, the best decoration is one that tells a story. Choose elements that evoke a shared memory, a shared hobby, or a special bond. This way, you can transform an ordinary envelope into a personalized work of art that's just as special as the gift itself.
Step 6: Check if the envelope is ready for use
After all your careful work, it's time for the ultimate test. A perfect envelope is more than just beautiful packaging; it's the first impression of your gift . Discover our tips for the best gift wrapping for that final finishing touch.
Start with a visual inspection. Place your envelope on a flat surface and examine it from different angles. Look for imperfections, loose edges, or areas where the adhesive hasn't adhered properly. A professional-looking envelope should be neat and symmetrical, with no visible wrinkles or tears.
Next, it's important to test the functionality. Carefully slide your gift into the envelope. It should slide in smoothly without wrinkling or getting stuck. The envelope should perfectly embrace the gift, neither too tight nor too loose . Too tight and you'll damage the gift; too loose and it will slide around.
Here are some key checkpoints:
- Are all edges securely attached?
- Does the gift slide in easily?
- Are the decorations securely attached?
- Do the folds look neat and crisp?
Consider the practical aspects. Will the envelope fit through a standard mailbox? Is it too thick or heavy for shipping? A beautifully decorated envelope loses its charm if it's not practical. If necessary, measure the dimensions and check if they fall within standard dimensions.
An often-overlooked aspect is the envelope's fragility. Decorations like loose bows or protruding embellishments can be damaged during transport. Gently press the edges and decorations to ensure everything is securely fastened. Remove any loose elements or secure them more securely.
If you have any doubts about the final result, don't hesitate to start over. Every envelope you make will be better than the last. The most important thing is that you create a personalized, carefully crafted envelope that's just as special as the gift itself.
Ultimately, the best test is the recipient's reaction. A well-made envelope tells a story before the gift is even opened. It's your chance to show how much effort and love you put into this gift.
Below is a handy checklist that will help you easily check whether your homemade envelope is ready for use.
| Checkpoint | Check off | Remark |
|---|---|---|
| All edges firmly secured | No loose or open spots | |
| Gift slides in easily | No wrinkles or jams | |
| Decorations firmly secured | No loose or protruding decorations | |
| Folds are neat and tidy | No cracks or dog-ears | |
| Envelope conforms to letterbox size | Suitable for shipping | |
| Envelope feels firm | Material not too soft or too thick |
Discover the difference with professional packaging materials from Kadopapier.net
Making your own creative envelope gift requires careful selection of materials and a personal touch. You might find it challenging to find the right paper, sturdy ribbon, or embellishments to make your gift truly stand out. Do you put so much effort into designing and crafting, but the final result still depends on the quality of your materials?
Starting today, choose the assurance of professional and inspiring packaging materials from Kadopapier.net . Here you'll find everything you need for your unique gift envelope, from sturdy wrapping paper to decorative ribbons and stylish accessories. Start browsing now and take your creative projects to the next level today. Give every envelope a personal and luxurious look that's sure to impress.
Frequently Asked Questions
What are the best materials for making an envelope gift?
You'll need quality paper or cardstock, such as tissue paper, decorative wrapping paper, or sturdy colored cardstock. Scissors, a bone folder or ruler, and tape or glue sticks are also essential tools.
How do I determine the correct size for my envelope?
Measure the gift you want to wrap and allow about 2 centimeters of extra space on all sides. This will give you enough margin for neat folding and gluing.
What decorations can I use to personalize my envelope?
Choose decorations that suit the recipient, such as ribbon, stickers, or handwritten calligraphy. Vintage stamps or small paper flowers are also nice additions.
How do I ensure the edges of my envelope are securely fastened?
Use double-sided tape or a glue stick for a secure attachment. Make sure the glue or tape is applied correctly to the folded edges and that you only attach the ends so the envelope remains easy to open.